Arista Switch Wrangling With XMPP
image courtesy of Arista
There are some things in a sysadmin’s life that simply need to scale. If you’re working in a growing footprint, then switch wrangling is one of those things. I reached that point at about a dozen switches in 6 different locations but just got around to building something recently. We use Arista switches and they have a built in XMPP client which made this really easy.
The most well known implementation of XMPP is probably Jabber. Jabber is an instant messaging client/server system that operates using the XMPP protocol. It’s cross-platform — it probably has more clients and servers than any other IM system in existence, and as such it’s pretty easy to find the parts to get this running.
You’ll need three things:
The switches need to use an XMPP client. Good news, this is built in to the Arista EOS.
Switch admins will also need to use an XMPP client to talk to the switches. Good news, there are a billion Jabber clients for every imaginable platform.
You will need a Jabber server for you and your servers to connect so you can ‘chat’. Good news, there are a billion Jabber server for every imaginable platform.
I am not going to cover installing and configuring an XMPP server. That documentation has been done to death on the internet so you should be able to grab an XMPP server for your platform here, and a client for your platform here.
If your new to the Jabber server thing I recommend using ejabberd. It is mature, well documented, and there’s a ton of information about it around the web to help you out.
Once you have your Jabber client talking to your Jabber server, come back and we’ll set about configuring the Arista to enter the fray.
Switch XMPP config
The Arista documentation for XMPP is in the Session Management section of the applicable EOS version manual. The basic set up requires you to tell your Arista what XMPP server to use, and some credentials to log into it. A more advanced setup allows your Arista to join group chats which is an extremely powerful feature.
To get the basic client working, you need to enter config t mode in your Arista which may require an enable password depending on how your Arista is set up.
enable config t management xmpp
Your prompt should now be (config-mgmt-xmpp)#.
Enter the following commands, substituting the variables with real info that matches your setup:
shut server $YOURJABBERSERVERFQDNORIP username $ARBITRARYNAMEOFTHISSWITCH password 0 $PASSWORD session privilege $PRIVILEGELEVEL domain $YOURXMPPDOMAIN
Some notes on the variables:
$YOURJABBERSERVERFQDNOR_IP: Pretty self-explanatory. Some routable domain or IP address that points to your Jabber server
$ARBITRARYNAMEOFTHISSWITCH: Make it something you will recognize in chat. Something like
LA3-unicastis a good name.$PASSWORD: There is a number preceding this (in this case 0) which tells the switch if the password is encrypted. If you’re configuring a pre-encrypted password use
password 7 $PASSWORDinstead. More details are in the Arista Session Management link.$PRIVILEGE_LEVEL: This is the default access level commands coming through XMPP will inherit. It needs to be high if you want to be able to actually make configuration changes on the switch. Much lower if you only want to query the switch in read-only mode such as checking version numbers, etc. Look at the PRIVILEGE EXEC section of the Arista Session Management link for more info.
$YOURXMPPDOMAIN: this is just a namespace, not a FQDN. You will have already set this in your XMPP server config, so use the same domain here.
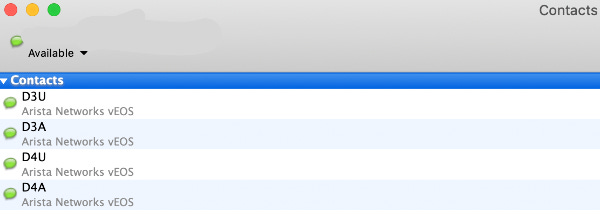
You can now issue the no shut command which should make your switch join your Jabber server. You won't notice this at first because your switch is not one of your contacts yet. Add the switch as a contact in your Jabber client and then you'll see it show up in your contact list and you can now chat to it like you would a human.
Jabber client uses
Single switches
The most obvious thing to do is talk to your switch. You can issue read-only commands like show version or sh arp or show int eth1-8 counter rates and get responses back from the switch.
If you’ve configured a higher privelege level, you can also make configuration changes to your switch such as add BGP configs.
It may seem like this isn’t all that much quicker/useful than logging in to your switch via shell, but it probably is. Consider that these commands are issued through a Jabber client — any Jabber client — even a mobile Jabber client. This makes accessing your switch possible from pretty much anywhere at any time.
Switch groups
In my opinion, the real power is multi-user chats. Or, more correctly, multi-switch chats. You can tell your switches to join multiple group chats by adding as many as the following lines as you’d like:
switch-group all-switches password 0 $PASSWORD switch-group anycast-switches password 0 $PASSWORD
This switch will now join two chat rooms; one for all switches and one for only anycast switches. These are just examples, but you are hopefully starting to get the idea of how powerful this is.
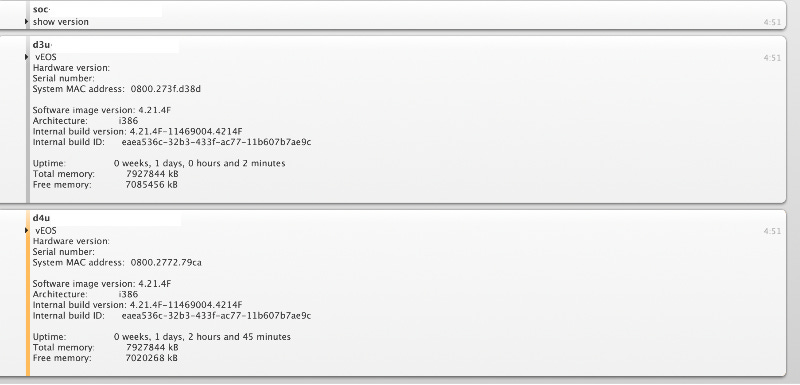
Note: You need to create the multi-user chat rooms in advance on your ejabberd server. I assume other XMPP servers require the same pre-configuration. Having all all-switch group chat allows me to issue a single command and get a response back from all my switches. In the example below I simply ask for the EOS version, but you can easily ask for throughput data or mlag status or anything else that you think is interesting.
Issuing multi-line commands
This stumped me for a while, but eventually I made sense of the single blog post on the internet that casually mentions a solution. Because you’re communicating with your switch via an XMPP client, the switch does not preserve state. This means that you can’t put the switch into config mode with one message and then proceed to issue it configuration commands in subsequent messages. As soon as you put it into config mode, it pops back out. This makes issuing multi-line commands difficult.
I assume this is a security feature to prevent switches from lying around in configuration mode, but I am not sure.
The answer is that you need to send all your commands in a single chat message. Take a look at the second screenshot in this post. I issue all these commands in a single message:
enable config t router bgp 12345 network 192.168.1.1/24
This adds the nonsense BGP ASN to my switch in one command.
Security
Arista XMPP support is an incredibly useful feature, but I cannot stress enough that accessing your switches via XMPP creates a huge security issue.
From a server security perspective it is not too bad. The XMPP support in the Arista is to act as a client so you are not opening up any ports on the Arista. However, the very thing that makes this so convenient is the very thing that makes it such a big security problem.
Consider that anyone who can log in to your XMPP server would also be able to add your switches as contacts. Another consideration is losing your phone/laptop/tablet that has a logged in Jabber session with all your switches.
To mitigate these security issues, consider at least the following:
Use the lowest privilege level setting possible in your Arista config. There’s an argument to be made about only allowing read-only access via XMPP. That would allow a sysadmin to keep an easy eye on traffic and do basic troubleshooting such as arp issues, but not allow any configuation changes to be made via the client.
Always stand up your own XMPP server. It’s theoretically possible for your Arista to join any XMPP server, even a public one, but that would obviously be an insane thing to do.
Lock down your XMPP server using the same best practices you would for your other critical machines: least privilege, firewall, OSSEC or other HIDS, 2FA if supported, etc.
Consider a company policy that disallows mobile clients connecting to the XMPP server to mitigate lost phones, etc.
That’s it. Enjoy your new chat buddies.
my shorter content on the fediverse: https://cosocial.ca/@jonw


