Syncing Things With Syncthing
This post is a good old-fashioned “How To”. There is no audio version because this type of post works best visually.
- * *
Syncing files across our many devices is big business. Internet giants like Dropbox have built an entire business around it. Google Drive is a critical tool in Google’s arsenal to harvest and sell our personal data and the well-known open-source project syncing project, NextCloud is sweeping the internet. There is no denying that there is a huge demand to have all our data at our fingertips on all our devices all the time. Syncing is the answer to this demand, but not the way these guys are doing it. Storing data in the cloud completely unnecessary to achieve sync-bliss and it increases your risk of data theft and exposure. The risk to reward ratio is low when using these cloud services and using a direct-sync tool like Syncthing lowers that risk dramatically while still providing up-to-date data on all your devices.
The 10-cent tour of syncing
Sync is a short form of the word synchronize. When we say our data is “synced” we really mean that the same version of that data exists on all the devices participating in the sync. When I change a spreadsheet on my home computer and save it to Dropbox, I know when I get to work I can pull that updated spreadsheet from the Dropbox folder on my work computer and carry on with my life. Google Drive, Nextcloud, and probably most other sync services work the same way.
These services do not directly sync my home computer with my work computer. Instead, they do third-party syncing. This means that there are multiple steps to the sync that are invisible to us.
In reality, when I change that spreadsheet and save it to Dropbox, all I’ve really done is synced my local copy of the spreadsheet to the copy on the Dropbox servers. The Dropbox servers then send that copy of the spreadsheet to my work computer and now all three copies are in sync. The third-party here is the Dropbox servers.
Lesser known, but better sync products do not employ an interim server. Rather, the devices that are to be synced share data directly between them with no middle-man. That is direct sync and is more preferable from a security standpoint.
The risks of sync services
Let’s back up a few paragraphs and reexamine this sentence:
The Dropbox servers then send that copy of the spreadsheet to my work computer and now all three copies are in sync.
Wait, wait. Three copies? Why are there now three copies of my spreadsheet that I am only sharing between two computers via Dropbox? Therein lies the tiny bit of the process that exposes your data to unnecessary risk.
The image above shows how a traditional third-party sync service works (no, I am not an aspiring artist) When you sync with these services, what you’re really doing is storing a copy on the internet. Each of your devices then “checks in” with that service to see if the document has changed, and downloads a local copy if so. When changes are made on a local device, the file is then uploaded to the internet again, and the process repeats.
The takeaway from this is that there is a copy of your data on the internet all the time. That is the copy of your data that has a heightened risk of being stolen.
The better solution
Syncing your data directly between your devices without leaving a permanent copy in the cloud is a much better solution. It’s a little harder to set up; let’s face it – removing that complexity is the main reason a lot of these sync services can make money – but it greatly lowers your risk profile. I use an application called Syncthing for this. Note how the flow of my data changes when using Syncthing in contrast to where my data resides when using a syncing service.
This is what we want! I am syncing my spreadsheet with two devices. There are only two copies of it and there are zero copies stored in the cloud for some bad guy to get at.
Let’s sync things with Syncthing
The very small, but incredibly important trait of Syncthing is that is it not a service. It is an application that you install on every device you want to sync across. Those devices then sync the data directly between them, without leaving any copies kicking around on the internet.
Unlike services, applications need to be compatible with the operating system on each device. In today’s world of disparate devices, it’s not uncommon for a person (like me) to have Linux and Windows desktops, Macbook laptops, iOS phones and tablets, and Android phones and tablets in our ecosystems. Some of my colleagues also run other operating systems like BSD or prefer to build applications from source code by compiling it themselves. The Syncthing folks know that in order for Syncthing to be useful it has to support the broadest possible set of operating systems and so it does. All but the most fringe amongst us will find a version of Syncthing that works with all our devices at this link. You can get mobile versions for your devices from the App or Play stores.
The process of downloading and installing Syncthing will vary depending on your operating system, but once it’s done and Syncthing is running, you should be able to access its configuration and monitoring interface. Unlike most applications, Syncthing presents its configuration via a web page that you will access in your browser. If you’ve ever accessed your router configuration, you will be familiar with the concept of using a browser to do stuff like this.
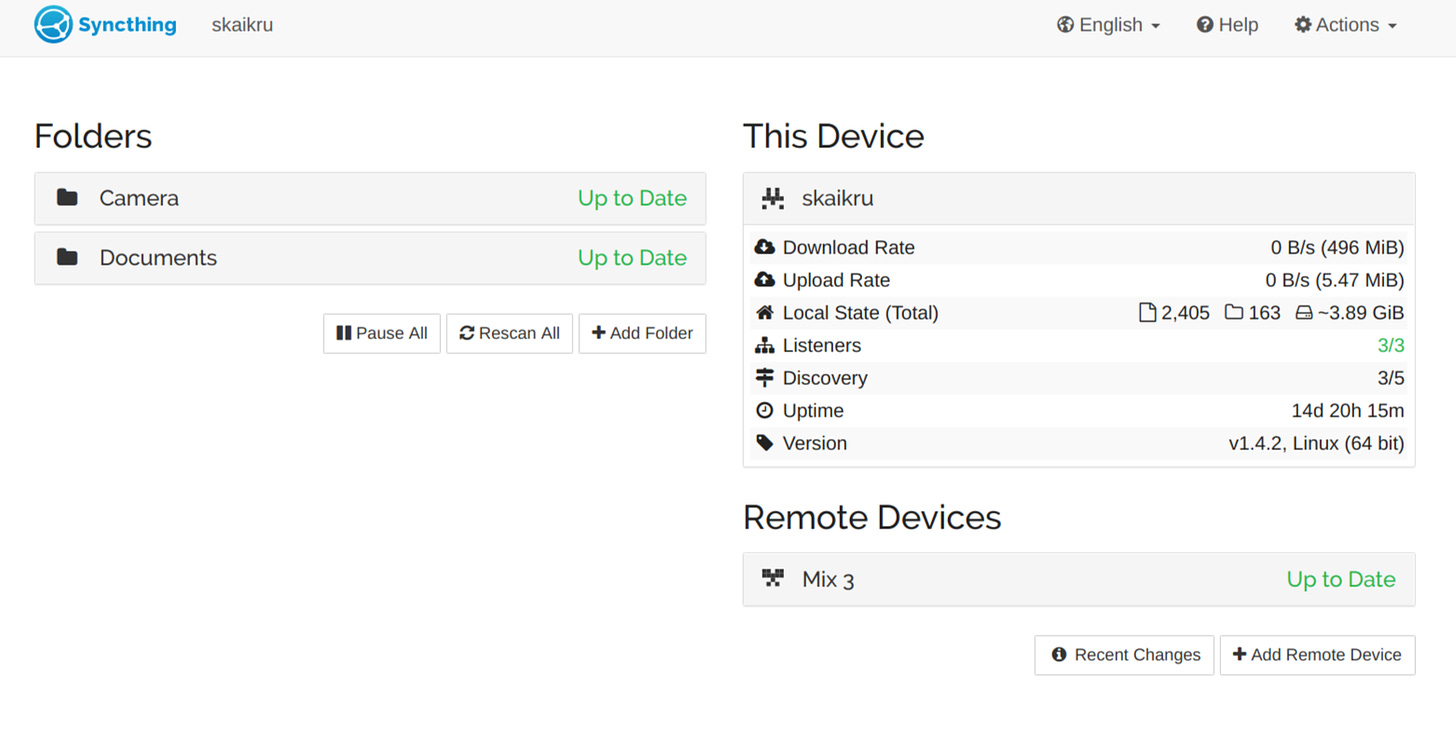
On Linux, the Syncthing app automatically launches my default browser for me and loads the Syncthing configuration page. Here is how mine looks, yours will be missing the entries in the Folders and Remote Devices sections because you are (probably) doing this for the first time.
If your browser does not automatically load this for you, click this link to do so: http://127.0.0.1:8384/
The 127.0.0.1 IP address is a special address that self-references your own computer. So, clicking that link will attempt to load the Syncthing configuration that is running on your own computer. There is no danger of downloading anything from the internet by clicking that link.
Because I have been running Syncthing for a while, there’s lots of interesting stuff here. The This Device section shows some stats about my syncing such as how much data I am syncing across devices (almost 4GB) and how much data is being transferred right now (0, because all my stuff is in sync at the moment).
The Folders section shows that I am syncing the Camera folder and the Documents folder from my computer. The Remote Devices section shows my Android phone that is also running Syncthing and sharing data with my computer. These two sections together show that I am syncing the pictures I take on my phone to my home computer and I am syncing a folder of documents between the two devices. Changes made on either device (my computer or my phone) will be synced.
You’ll likely to be staring at a mostly empty screen so let’s set some stuff up.
There are two basic building blocks that need to exist before any data will be synced. First, you must tell Syncthing what to sync, which is done in the Folders section. Next, you must tell Syncthing where to sync it, which is done in the Remote Devices section. And you need to set these two things up in that order.
Tell Syncthing What to Sync
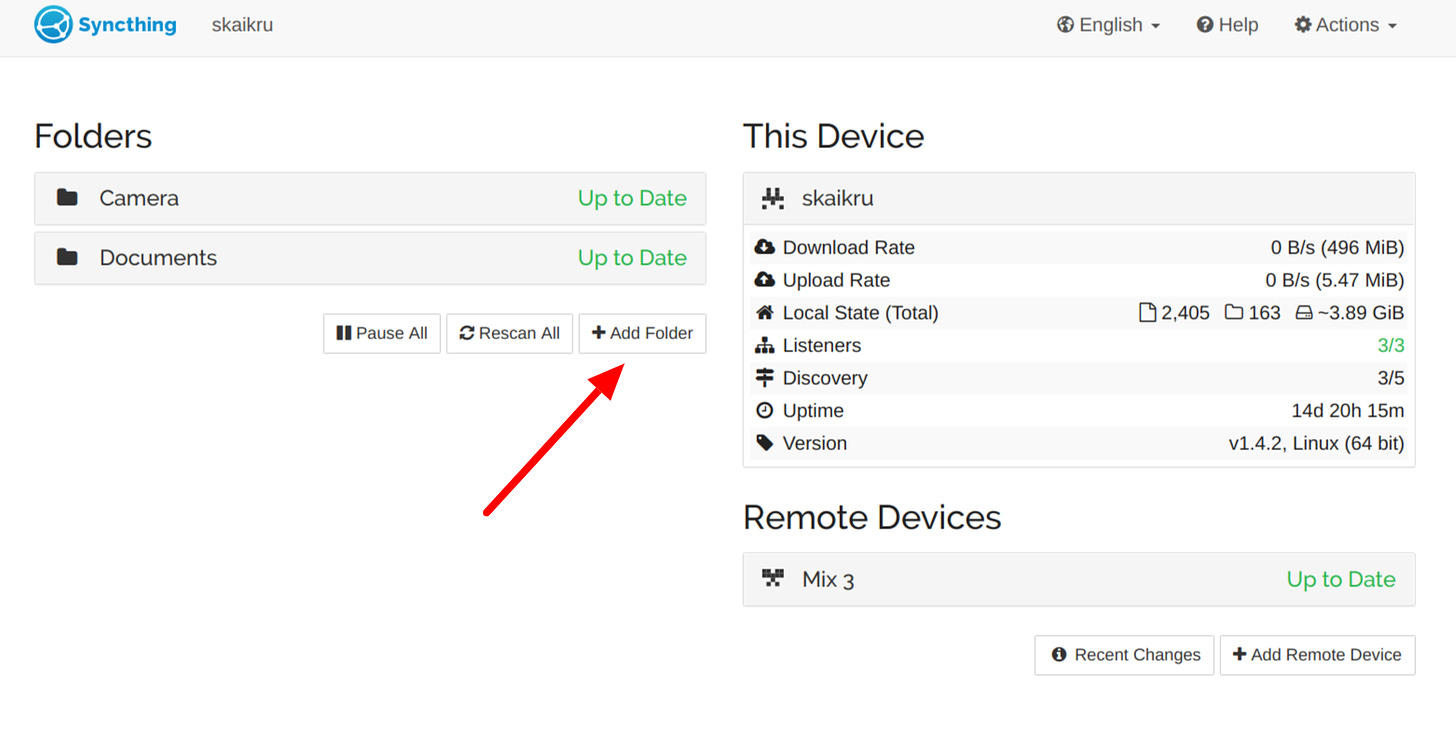
Click the Add Folder button to add a location on your computer that you want to sync with other devices.
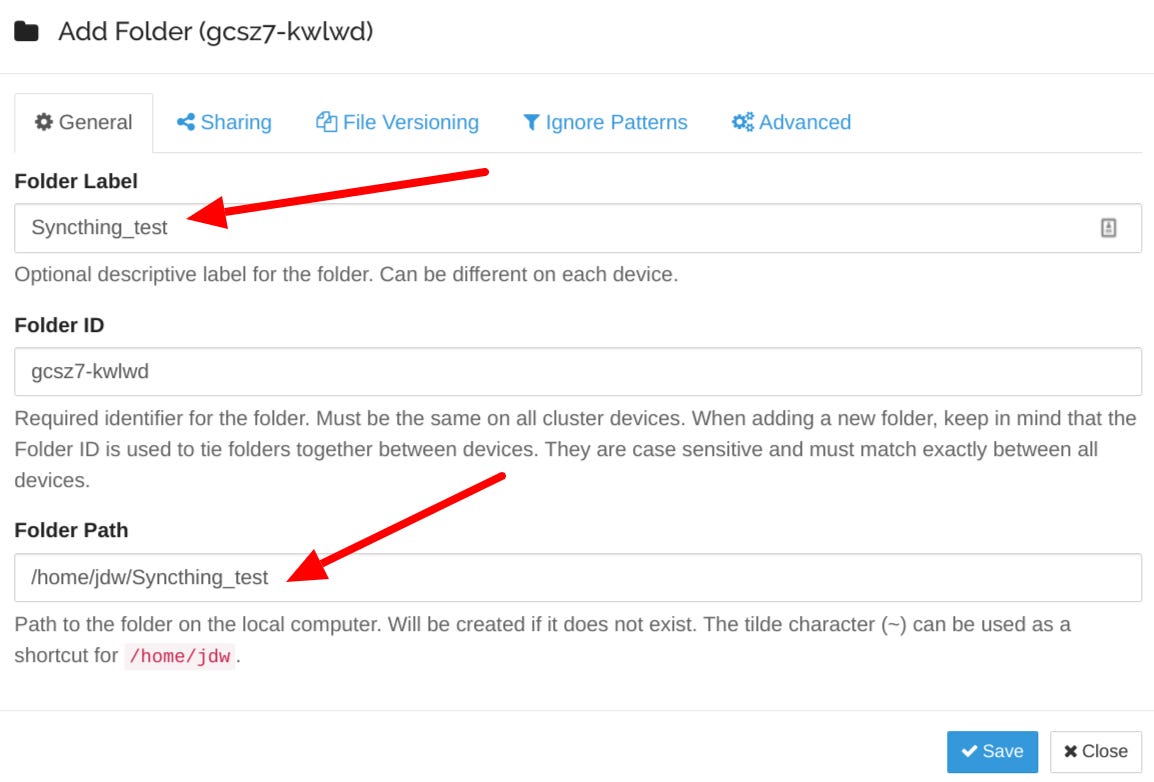
Enter a Folder Label. That is just a name and it can be any name. But Syncthing will automatically fill in the Folder Path section with that name. You can change the Folder Path manually and you may have to because it has to point to a directory on your computer that you want to sync. I use Linux so my file paths are in the form of /home/username/something which is similar to how you’ll see file paths on a Mac . In Windows, you will likely see something more like c:\users\username\something
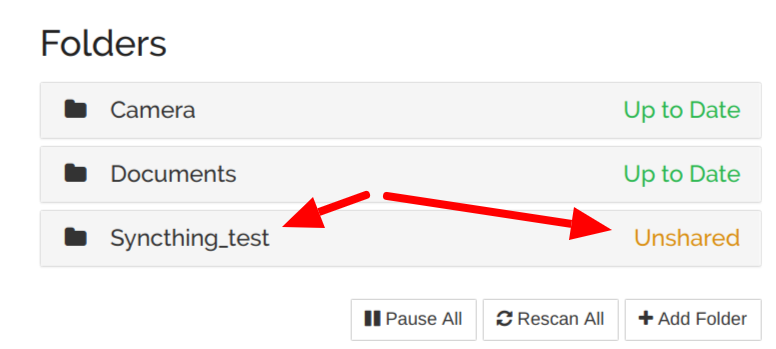
Don’t worry about anything else here. You can come back later and fiddle with the knobs and dials if you want to. Just click the Save button and you will see your new folder listed in the Folders section on the Syncthing web interface now.
You will see that your folder is now in the list, but it is not shared with any other device yet.
We’re halfway there. Now we just need to tell Syncthing where to sync that data by adding a device to sync with. You’ll want to click the Add Remote Device button in the Remote Devices section but don’t. You can add a device that way, but you’ll need to type in a very long device ID and nobody wants that headache. There’s a much easier way to add a remote device.
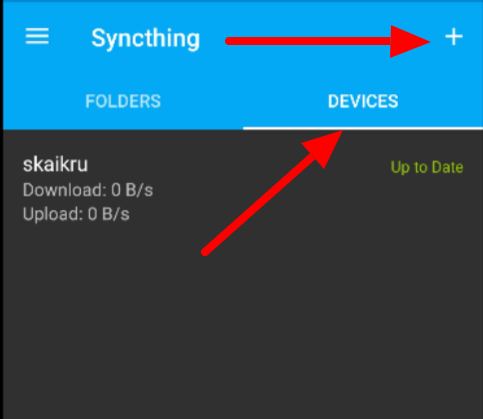
Leave the Syncthing web config page alone for a moment and pick up your mobile device. Download the Syncthing app from your App or Play store. Once you have it installed, launch it and click the Devices tab.
I already have my computer added (yes, I am a fan of the show “The 100”) but you will probably be looking at a blank page. Be sure you are on the Devices tab and click the + sign in the top-right corner.
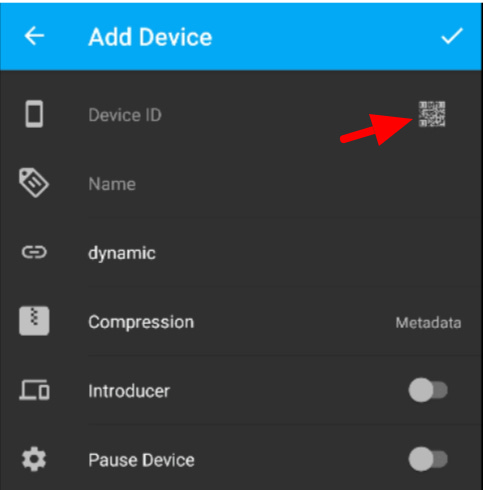
The Device ID is what we’re after. Tap the QR code icon to the right of the Device ID field. That should fire up your device’s camera.
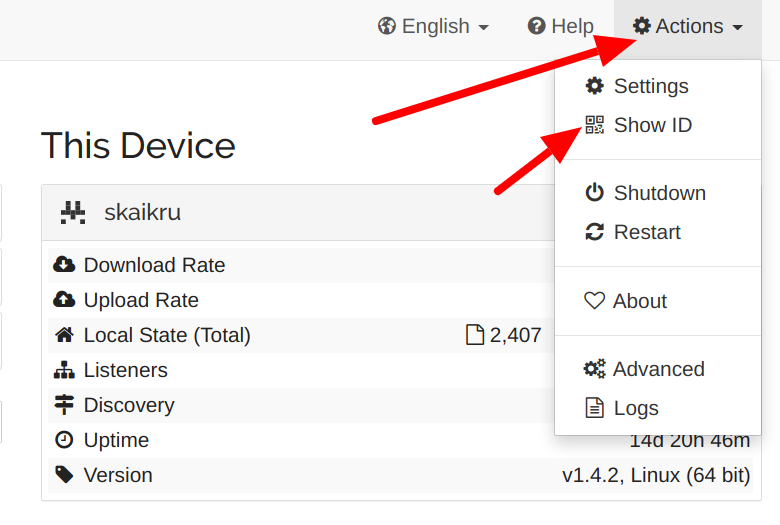
Now, go back to your computer and click the Actions menu at the top right. Then click the Show ID option.
You will be rewarded with a QR code. Scan that with your device and voila! Your device should now show up on the Syncthing web config page under the Remote Devices section.
I will not show a screenshot of my QR code because it would allow anyone to sync with my computer. You should not share that QR code anywhere, either.
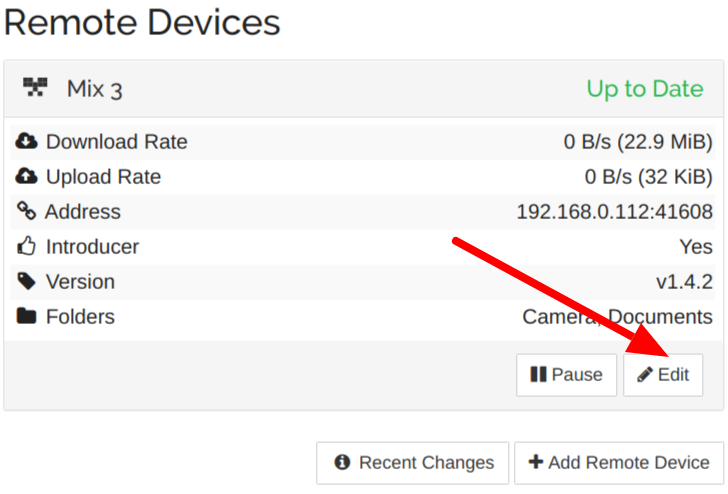
Now we have our two pieces: we’ve added a folder to sync and we’ve added a device with which to sync. The final step is to tie them together. There are a few ways to do this, but I think the easiest is to click your device in the Remote Devices section to expand it, then click the Edit button. This will open up the options for that device.
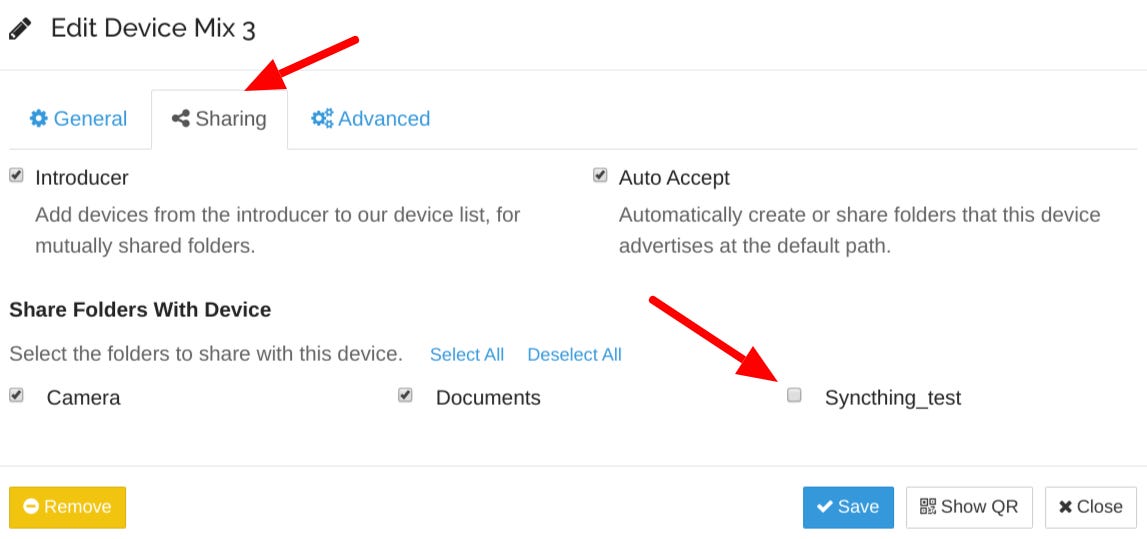
Click the Sharing tab and you’ll see your folder. In my example, there are three folders because I already have syncing set up, but you can see the example folder I created is currently unchecked. That means that folder will not sync with this device.
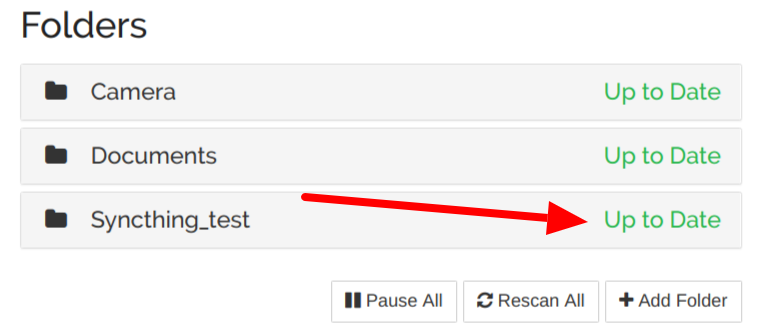
Check that box, click Save and you’ll see your test folder status update. Because it is likely empty, it will happen very fast and the status of that folder will change from Unshared to Up to Date. You may think that means it is synced with your phone, but it’s not yet. The Up To Date status just means that Syncthing has scanned the folder and knows what is in it. Yeah, I agree. That’s pretty misleading.
There’s one final trick. I don’t know how it looks on an Apple device, but on an Android, you will get a notification that your computer wants to share a folder with your device. You will need to accept that notification and then choose (or create) a folder on your device to sync that data into. I can’t get a screenshot of that notification because of the limitations of snapping shots of a notification shade on Android.
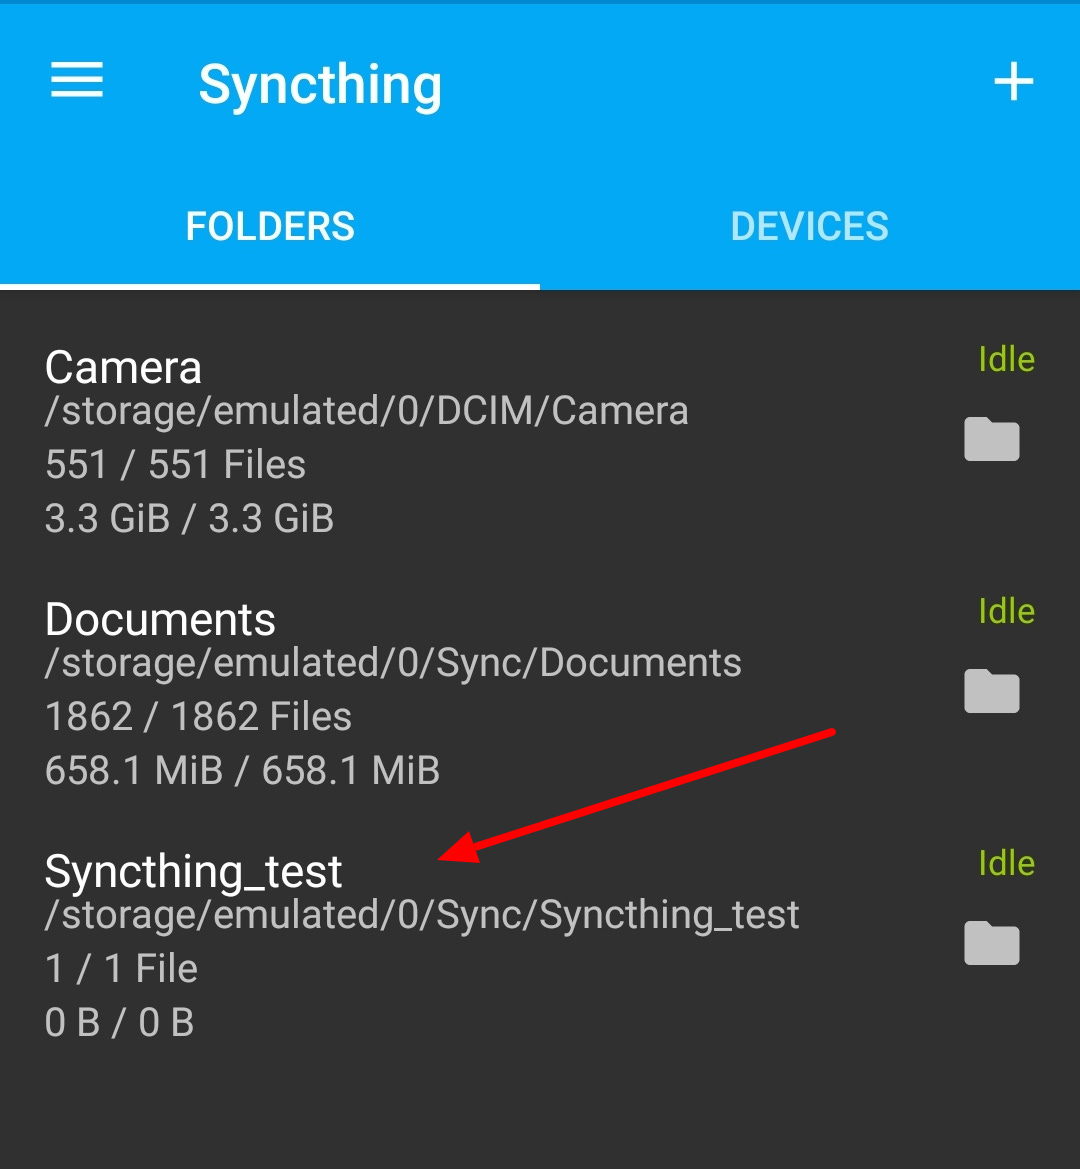
Once you’ve accepted the sync request and entered the folder you want your computer’s data synced into, you will see your new folder in the Syncthing app on your device.
From now on, any files that you put into that folder on either device will automatically sync to the other device. I dragged a file into the Syncthingtest folder on my desktop and it showed up in a few seconds in the Syncthingtest folder on my phone.
Last considerations
Here are some last-minute things that don’t affect your setup, but are good to know.
Multiple devices
In this post, we’ve looked at how to set up folder syncing between two devices. But you can set up many more folders and many more devices. In the past, I have had a specific folder on my computer set up to sync to 3 mobile devices and my partner’s laptop. That made it very easy to share pictures and other documents by just dragging files into that folder. Once you have a single sync folder running, add more devices to it!
Relays
There are situations where your two devices won’t be able to talk to each other directly. This can be due to restrictions on the network you’re connected to, such as secure work networks, or it can just be due to the vagaries of the internet. To combat this, Syncthing has a series of “relay” servers that act as middle-men between all your devices.
Relays work by default. You do not need to set them up. Your data that passes through a relay is end-to-end encrypted meaning that it can only be read by the devices that it is syncing. The relay operator cannot see what your data is, just that it is passing through the relay. However, what the relay operator can see is your IP address and device IDs. I don’t consider that a security risk because IPs are public anyhow, and although a malicious actor could try to sync with you using your device ID, you need to accept that request before it would happen and that would almost certainly set off alarm bells for you if you received an unsolicited sync request from your Syncthing app.could try
More information on relays is here.
One-way sync
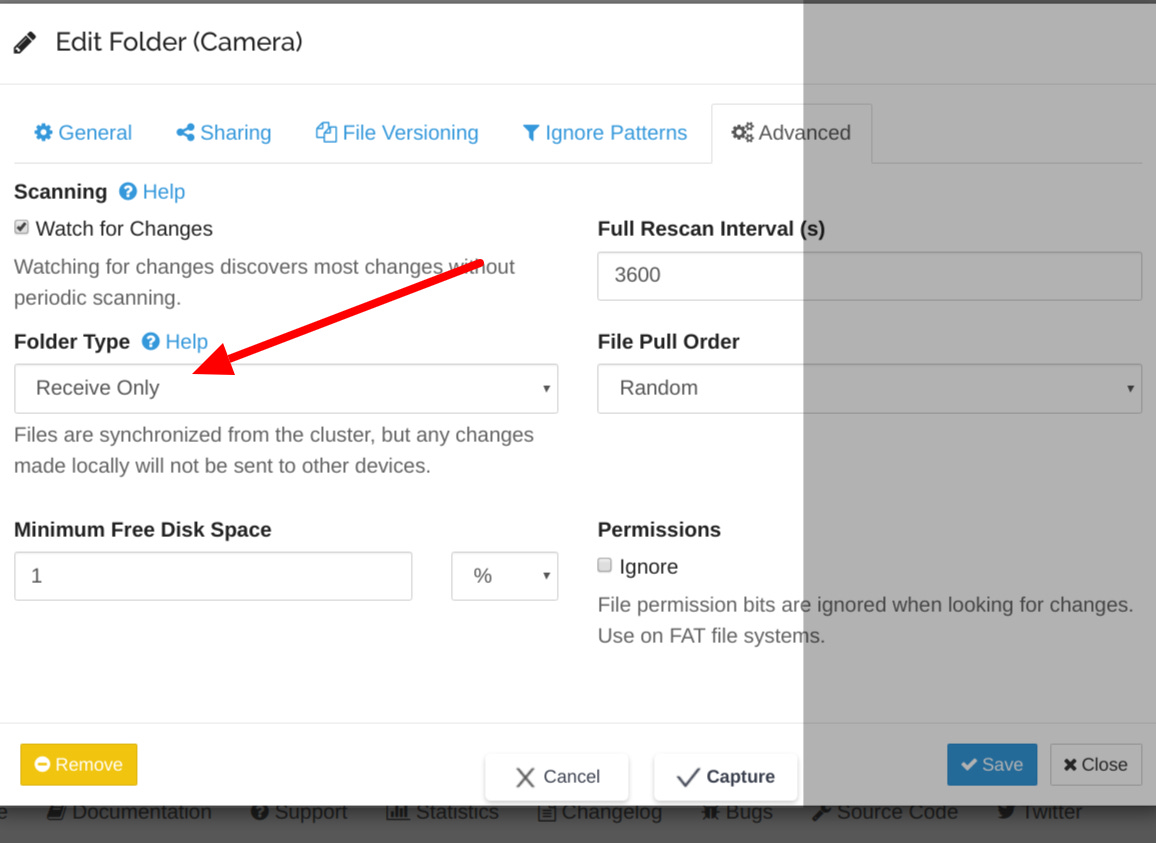
Technically, syncing data in one direction isn’t syncing at all. It is just copying from A to B. Sometimes that is what you want. A good example is the Camera folder on my phone. I only “sync” that folder one-way from my phone to my computer because I don’t take pictures with my computer so there would never be a new picture to sync in that direction. Newly created folders sync both ways by default, but you can change that by clicking the Edit button for the folder in question, clicking the Advanced tab, and changing the Folder Type to another option.
Sync is not backup
It’s tempting to think that syncing is the same as backup. But, it is not. The main feature of a backup is that data in the backup will not be deleted if that source data is deleted from the source device. That allows you to recover data from your backup that has been removed or has become corrupted on your phone or computer.
In contrast, syncing seeks to make all copies of your data across all your devices the same. Therefore, if you delete a file on your phone, it will also be deleted from all the other devices you’re syncing with. That is not a bad thing, it is designed that way. But, you should be aware of it.
Divest yourself of the idea of an “account”
I may be beating a dead horse here, but I want to make sure this part is clear. The big sync services we’re familiar with require us to create an account and then install their app and log in to that account on all the devices.
You’ve probably noticed that creating an account somewhere is not a step that is included in this post. This is because you control what devices can join your sync network via adding devices to each other with the QR code instead of a central account.
Wrap up!
There are a ton of features in Syncthing that I did not touch on but this should get your going. Once you have basic syncing working, I encourage you to review the options in the Folder and Device menus. There are lots of neat little tweaks you can make to your sync setup to personalize it and make it behave just how you want.
Happy syncing!
my shorter content on the fediverse: https://cosocial.ca/@jonw


